- Published on
Set up token authentication with OpenIddict in .NET 5
- Authors
- Name
- Nico Botha
- @nwbotha


What is OpenIddict?
OpenIddict is a .NET Core implementation of the OpenID Connect server middleware allowing you to easily set up an OpenID Connect server in any .NET Core / .NET 5 app.
Why an OpenID Connect server?
Adding an OpenID Connect server to your application allows you to support token authentication. It also allows you to manage all your users using local password or an external identity provider (e.g. Facebook or Google) for all your applications in one central place, with the power to control who can access your API and the information that is exposed to each client.
Source: https://documentation.openiddict.com/guide/index.html
Set up OpenIddict in .NET 5
For demo purposes, I created a new .NET 5 API project using Visual Studio. The source code can be found here: https://github.com/Ngineer101/openid-connect-dotnet-5.
Step 1
Install the required NuGet packages:
-
To set up Entity Framework Core
- https://www.nuget.org/packages/Microsoft.EntityFrameworkCore
- https://www.nuget.org/packages/Microsoft.EntityFrameworkCore.Tools
- https://www.nuget.org/packages/Microsoft.EntityFrameworkCore.Sqlite (This package will depend on the type of database used - SQL Server, PostgreSQL etc.)
-
To set up OpenIddict
Step 2
A DbContext is required to use OpenIddict with Entity Framework. Create a DefaultDbContext.cs class.
public class DefaultDbContext : DbContext
{
    // entity sets here...

    public DefaultDbContext(DbContextOptions<DefaultDbContext> options) : base(options) { }

    // ...
}
Then, add the OpenIddict entity sets to your DbContext by adding the following code in the ConfigureServices method in the Startup.cs class.
This will ensure that the OpenIddict tables are created when you create and apply the initial database migration.
// Register your DbContext
services.AddDbContext<DefaultDbContext>(options =>
{
    options.UseSqlite(Configuration.GetConnectionString("DefaultConnectionString"));
    options.UseOpenIddict(); // Add the OpenIddict entity sets
});
Step 3
Configure the identity system to use the OpenIddict claim types by adding the following code in the ConfigureServices method in the Startup.cs class.
services.Configure<IdentityOptions>(options =>
{
    options.ClaimsIdentity.UserNameClaimType = OpenIddictConstants.Claims.Name;
    options.ClaimsIdentity.UserIdClaimType = OpenIddictConstants.Claims.Subject;
    options.ClaimsIdentity.RoleClaimType = OpenIddictConstants.Claims.Role;
    // configure more options if necessary...
});
Step 4
Now, it's time to configure the OpenID Connect server. Add the following code to the ConfigureServices method
in the Startup.cs class (see comments for explanations):
// OpenID Connect server configuration
services.AddOpenIddict()
    .AddCore(options => options.UseEntityFrameworkCore().UseDbContext<DefaultDbContext>())
    .AddServer(options =>
    {
        // Enable the required endpoints
        options.SetTokenEndpointUris("/connect/token");
        options.SetUserinfoEndpointUris("/connect/userinfo");

        options.AllowPasswordFlow();
        options.AllowRefreshTokenFlow();
        // Add all auth flows you want to support
        // Supported flows are:
        //      - Authorization code flow
        //      - Client credentials flow
        //      - Device code flow
        //      - Implicit flow
        //      - Password flow
        //      - Refresh token flow

        // Custom auth flows are also supported
        options.AllowCustomFlow("custom_flow_name");

        // Using reference tokens means the actual access and refresh tokens
        // are stored in the database and different tokens, referencing the actual
        // tokens (in the db), are used in request headers. The actual tokens are not
        // made public.
        options.UseReferenceAccessTokens();
        options.UseReferenceRefreshTokens();

        // Register your scopes - Scopes are a list of identifiers used to specify
        // what access privileges are requested.
        options.RegisterScopes(OpenIddictConstants.Permissions.Scopes.Email,
                        OpenIddictConstants.Permissions.Scopes.Profile,
                        OpenIddictConstants.Permissions.Scopes.Roles);

        // Set the lifetime of your tokens
        options.SetAccessTokenLifetime(TimeSpan.FromMinutes(30));
        options.SetRefreshTokenLifetime(TimeSpan.FromDays(7));

        // Register signing and encryption details
        options.AddDevelopmentEncryptionCertificate()
            .AddDevelopmentSigningCertificate();

        // Register ASP.NET Core host and configuration options
        options.UseAspNetCore().EnableTokenEndpointPassthrough();
    })
    .AddValidation(options =>
    {
        options.UseLocalServer();
        options.UseAspNetCore();
    });

services.AddAuthentication(options =>
{
    options.DefaultScheme = OpenIddictConstants.Schemes.Bearer;
    options.DefaultChallengeScheme = OpenIddictConstants.Schemes.Bearer;
});
Step 5
Configure the default identity system for your application. Specify the default User and Role entities and add a UserStore.cs and RoleStore.cs class. Then,
add the following code to the ConfigureServices method in the Startup.cs class.
services.AddIdentity<User, Role>()
    .AddSignInManager()
    .AddUserStore<UserStore>()
    .AddRoleStore<RoleStore>()
    .AddUserManager<UserManager<User>>();
View examples of the User, Role, UserStore, and RoleStore classes here:
https://github.com/Ngineer101/openid-connect-dotnet-5/tree/master/NWBlog.OpenIdConnect.Demo/Identity.
Step 6
Add the authentication middleware to your application by adding app.UseAuthentication() in the Configure method in the Startup.cs class.
app.UseRouting();

app.UseAuthentication(); // add this line
app.UseAuthorization();
Step 7
Run the following commands in your Visual Studio package manager console to create and apply the first database migration:
Add-Migration InitialCreateUpdate-Database
If you are using the DotNet CLI to create and apply migrations, run the following commands:
dotnet ef migrations add InitialCreatedotnet ef database update
Note: don't forget to add your database connection string to the appsettings.json config file.
Step 8
A valid OpenID Connect client application is required to call the token endpoints. Create an OpenID client application on startup by adding the following
code in the Configure method in the Startup.cs class.
// Create OpenID Connect client application
using var scope = app.ApplicationServices.GetRequiredService<IServiceScopeFactory>().CreateScope();
var context = scope.ServiceProvider.GetRequiredService<DefaultDbContext>();
context.Database.EnsureCreated();

var manager = scope.ServiceProvider.GetRequiredService<IOpenIddictApplicationManager>();
var existingClientApp = manager.FindByClientIdAsync("default-client").GetAwaiter().GetResult();
if (existingClientApp == null)
{
    manager.CreateAsync(new OpenIddictApplicationDescriptor
    {
        ClientId = "default-client",
        ClientSecret = "499D56FA-B47B-5199-BA61-B298D431C318",
        DisplayName = "Default client application",
        Permissions =
        {
            OpenIddictConstants.Permissions.Endpoints.Token,
            OpenIddictConstants.Permissions.GrantTypes.Password
        }
    }).GetAwaiter().GetResult();
}
Step 9
Add an AuthenticationController with an Exchange endpoint to handle the different authentication flows configured in your OpenID Connect server.
[HttpPost("~/connect/token")]
[Consumes("application/x-www-form-urlencoded")]
[Produces("application/json")]
public async Task<IActionResult> Exchange()
{
    var oidcRequest = HttpContext.GetOpenIddictServerRequest();
    if (oidcRequest.IsPasswordGrantType())
        return await TokensForPasswordGrantType(oidcRequest);

    if (oidcRequest.IsRefreshTokenGrantType())
    {
        // return tokens for refresh token flow
    }

    if (oidcRequest.GrantType == "custom_flow_name")
    {
        // return tokens for custom flow
    }

    return BadRequest(new OpenIddictResponse
    {
        Error = OpenIddictConstants.Errors.UnsupportedGrantType
    });
}
When you make a request to the ~/connect/token endpoint with a username, password, client_id, and client_secret you will receive the appropriate sign-in
response. See an example request and response in the screenshot.

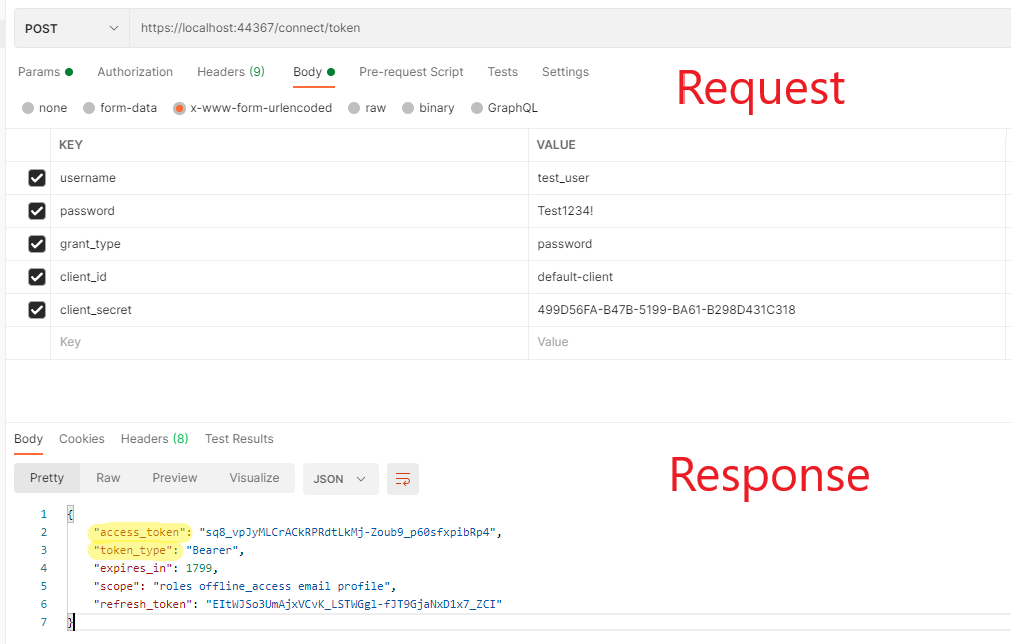
The access_token in the response can be used in the Authorization header of subsequent requests to the API.
Note:
The client_id and client_secret should not be hard-coded in your front-end. A possible solution is to download the client_id and client_secret when
the application loads (in the browser) and have a strict CORS configuration to only allow resource sharing with certain origins. Then, it's also possible
to periodically change the client ID and client secret values to prevent misuse (beyond the scope of this post).
An OpenID Connect server can be configured in many ways depending on your requirements. All possible configurations are not covered in this blog post. Check out the official documentation for more information and examples.
To view the complete working demo check out this repository: https://github.com/Ngineer101/openid-connect-dotnet-5.